Finding the sweet spot
When deciding how to capture vehicle-based scenes for their short film Sherbet, indie filmmakers Tom French (cinematographer), Danny Gibbons (director) and Camilla Dazzi (gaffer) decided to take a DIY approach to virtual production. Here, the trio take us through their innovative tools and techniques.
The way we make films is constantly evolving and there is no doubt that virtual production (VP) has become the go-to method for any vehicle-based scenes which require controlled lighting and backgrounds for continuity. Productions such as The Mandalorian, Masters of the Air and The Batman opted for virtual production ahead of ‘on-location’ methods and it’s easy to see why; filmmakers have longed for an environment that they can control every element of. But just how accessible is the method outside of the studio system and what options does that leave independent filmmakers looking to get in on the action?
After reading some in-depth articles on British Cinematographer’s website, we set out to see if VP was a viable option for shooting a short film which is set entirely inside of a moving car. Unsurprisingly, it’s still largely outside the grasp of independent filmmakers – with new experimental technology comes a hefty price tag. VP stages in and around London were charging between £5,000 and £10,000 per day. While we understand the industry demand for VP, it just isn’t affordable without proper financial muscle, especially for those making a short film.
Fortunately, there is an alternative. It’s not perfect, but it’s an alternative.
We then sat down and had an in-depth conversation about our options. Rattling through whether to shoot on an actual road or with green screens, but VP was above and beyond the preferred method. So, we discussed what VP was at its core. When you strip it down, VP is essentially very large, high-luminance TV screens and once you boil it down to that, it quickly becomes far more achievable on a budget. While we would lose the ability to adapt the live environment at our will in Unreal Engine, the driving plates that we shot ourselves would ultimately do most of the heavy lifting for us. Basically, the posh poor-man’s process.
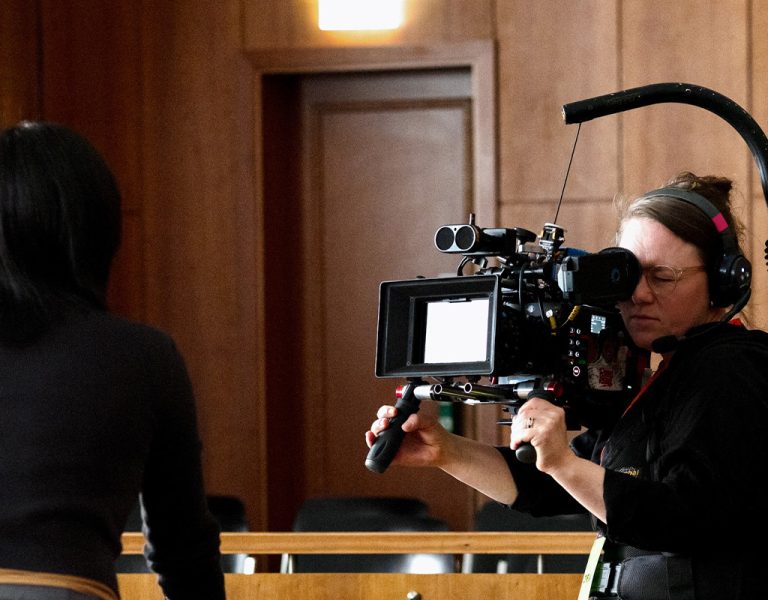
TVs
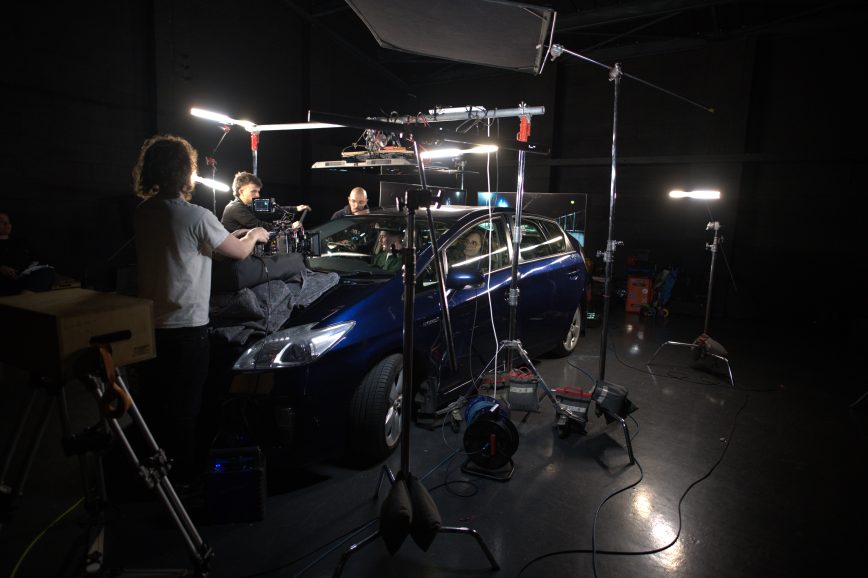
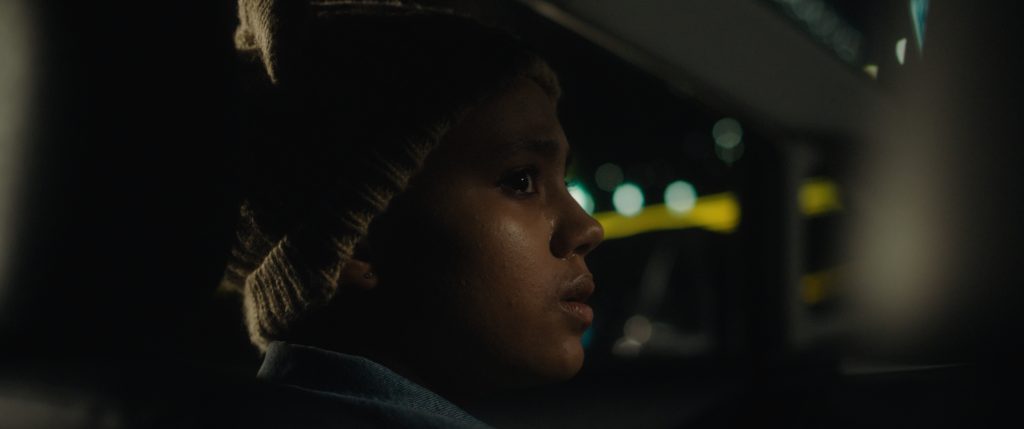
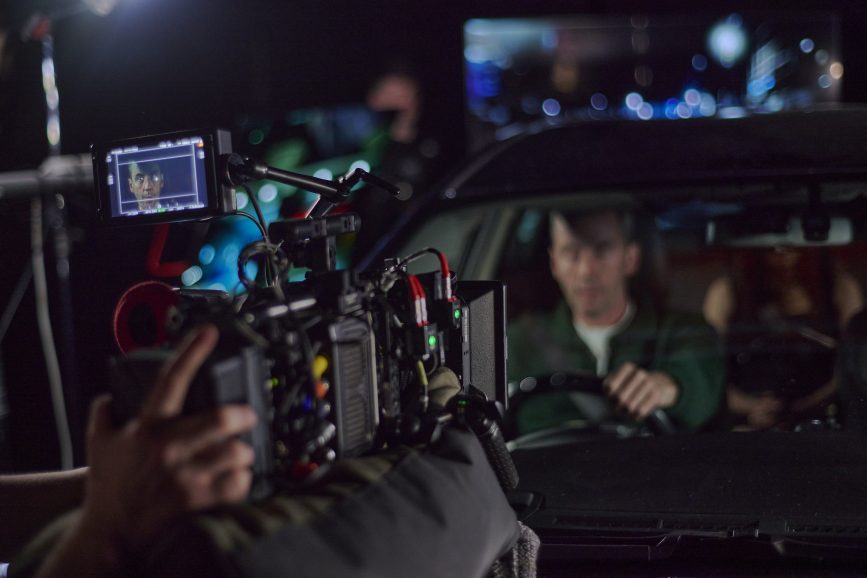
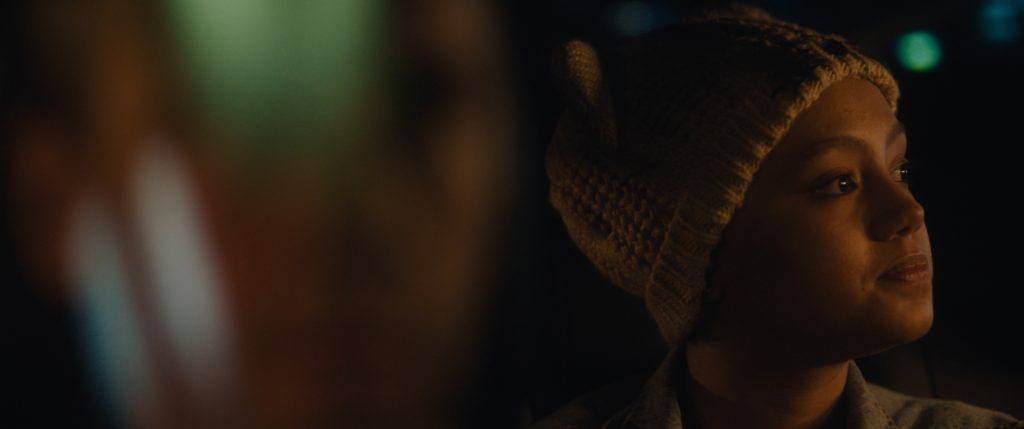
So, where do we even begin with creating our own DIY virtual production? First, before we even thought about getting on set, we needed TVs that would do the job. Settling on three 65” Samsung S95Bs we’d be able to have one or two directly behind our actors depending on the shot angle and a third for creating reflections in the windows. With the TVs having such a high output at 2000 nits it meant we could use them as fill lights. This is one of the main issues with using rear projection as you don’t get that punchy luminance that creates natural fall-off and clipping highlights, which really helps create natural bokeh.
We took a deep breath, a nervous laugh, and bought them from what will remain an unnamed retail giant hoping that we’d be able to sell them on after the shoot. We figured the worst-case scenario would be that we end up with a very good TV for a month or two whilst we wait for someone to buy it. If money was no object, we would have been able to output 12-bit 4k images to the TVs, but due to budgeting we only ended up getting 10-bit 1080p. Which I think is testament that you don’t need a super bright VP LED wall to achieve realistic-looking imagery. Work within the dynamic range of the TVs and the camera, and you’ll be fine.
Lighting
In terms of lighting, our gaffer, Camilla Dazzi, and I decided to go with Astera Titan tubes for our primary sources, which gave us nuanced control over the colour of the light and how it pulsed. The Titans allowed us to have fixed lighting positions and create realistic effects of light passing by the car. During prep director Danny Gibbons and I discussed using lighting cues to signify changing emotions, energies, and progression as the car travels through the city. These would gradually get brighter as the characters’ emotions evolve during the journey.
Camilla would tailor the pulses of lighting on the Asteras via DMX during takes, paying close attention to the dialogue and the plates for all the little lighting cues. So, when the car comes to a stop and Rene expresses his frustration, you get a flash of red on his face from brake lights and it all feels completely natural and hidden in plain sight.
One of the technical challenges of this was balancing the exposure of the TVs, the actors’ faces, and the inside of the car so that it all felt cohesive. We used the TVs as the base reference for exposure in camera, then built the lighting inside of the car accordingly so that the TVs were contrasty enough that the blacks felt like real darkness and the lights in the plates were getting close to clipping. Despite this challenge, the resulting stylised look felt real enough to be believable while also creating a dreamy atmosphere.
Driving plates
With the TVs and lights sorted, now we needed some driving plates which we knew would be crucial to pulling this all together. We managed to cobble together four Pocket 4Ks from friends and some suction cup mounts to shoot the plates. We planned the route in advance, hoping 2am on a Wednesday would give us the level of traffic we needed and clear enough roads to drive the route in good time.
We covered the front, back, left, and right with 18mm lenses at T5.6. These were very cheap and mismatched lenses from different brands. I knew they would be out of focus, so wasn’t worried about consistency or sharpness. A matte box or lens hood would, however, have been very useful to eliminate some of the lens flares and veiling glare caused by cheap lenses.
On set, we lost time making the French overs work as the perspective of the horizon was off. We made it work by squishing one edge of the footage in QTAKE to force the perspective back to level again. In hindsight, we should have rented two more cameras to shoot 45-degree angle plates to save us troubleshooting on set.
QTAKE
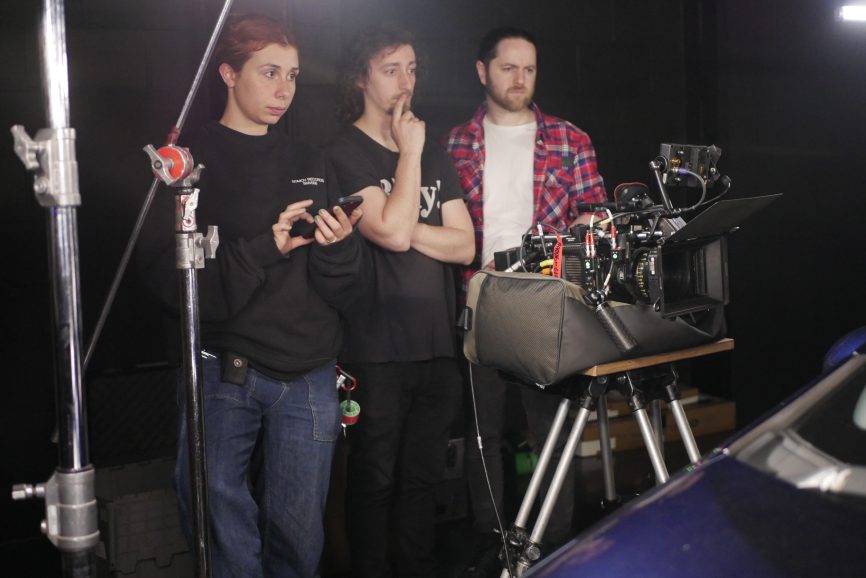
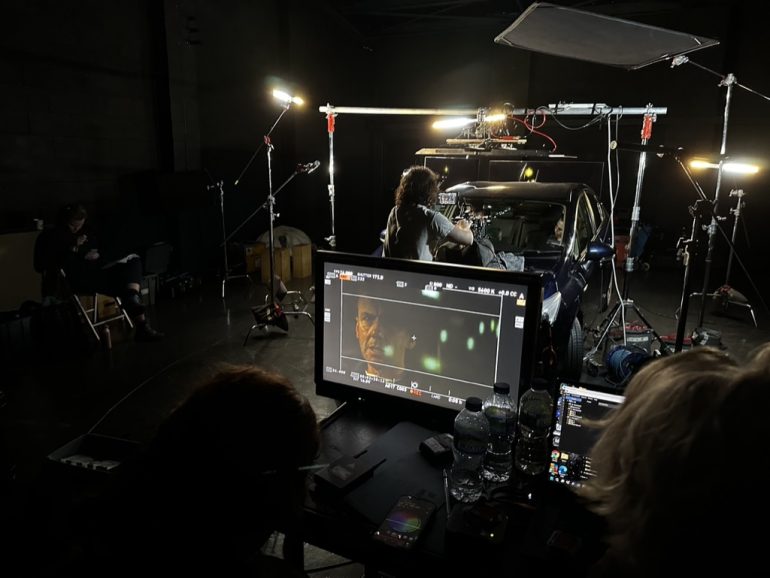
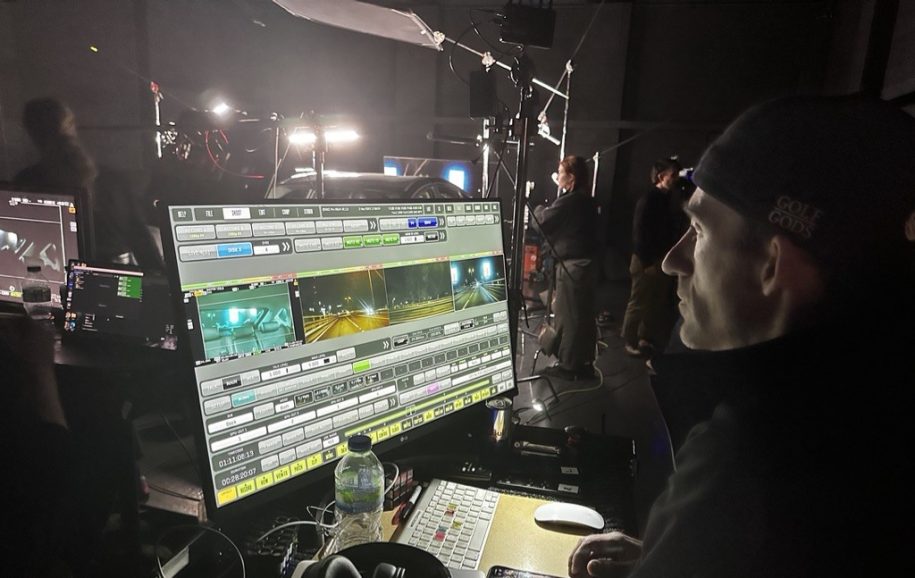
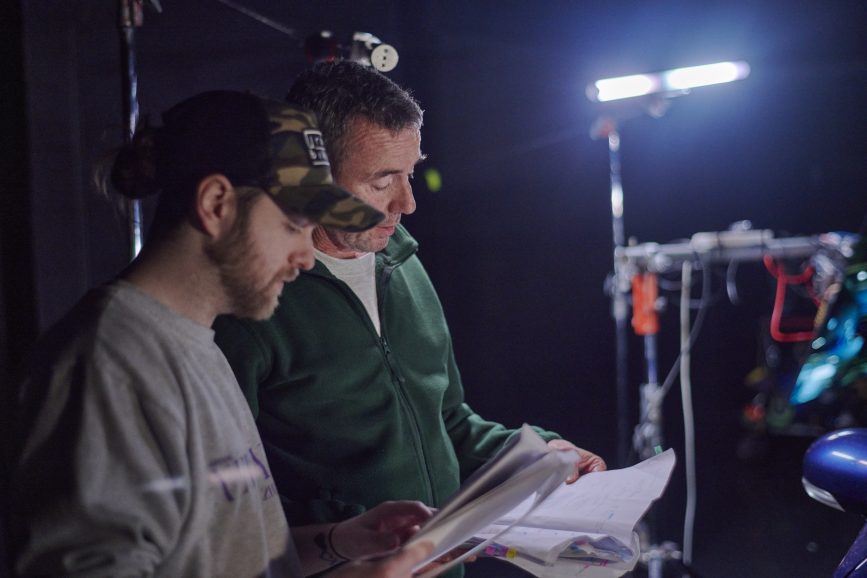
The final hurdle was managing to get our driving plates to all play back in sync at the same time across three separate TVs. After spending some time on some larger productions QTAKE came to mind as a potential solution for this. It’s predominantly used on features and HETV to distribute the picture from the camera to anyone on set who might need it. With the expertise of our video operator, James Wade, we uploaded all the driving plates and got them all to playback in sync with no issues. This means if we needed to quickly jump back to the top of the take James could effortlessly reset the plates and keep everything flowing.
There was also an instance where we wanted the reflections to be flipped and reversed to ‘feel’ more natural, whilst leaving the other two TVs playing back normally. Having worked with James many times we had a shorthand that made life considerably easier when explaining what I needed. In our situation, compared to VP stages QTAKE is far superior as it’s optimised for playback whilst the operating systems for VP stages are still in early development and doesn’t currently have the same level of control as QTAKE provides.
Camera package
Now for the nuts and bolts of it all. We shot on an Alexa Mini Open Gate in ARRIRAW with Cooke S4s (35, 50, 85, and 100mm) predominately shooting 50mm and tighter to allow us to create the depth we needed to separate the actors from the TVs in a realistic manner, so we weren’t shooting off the edge of the screens. We built the camera to be as low-profile as possible, no top handle, under-sling everything so I could get myself and the camera into smaller spaces than a typical Mini build would allow.
I exposed everything using the TVs for my base exposure, initially thinking 800 ISO would work for how bright I thought they were. I settled on 1250 ISO as I needed a little more latitude in the highlights, and I liked slightly more noticeable grain.
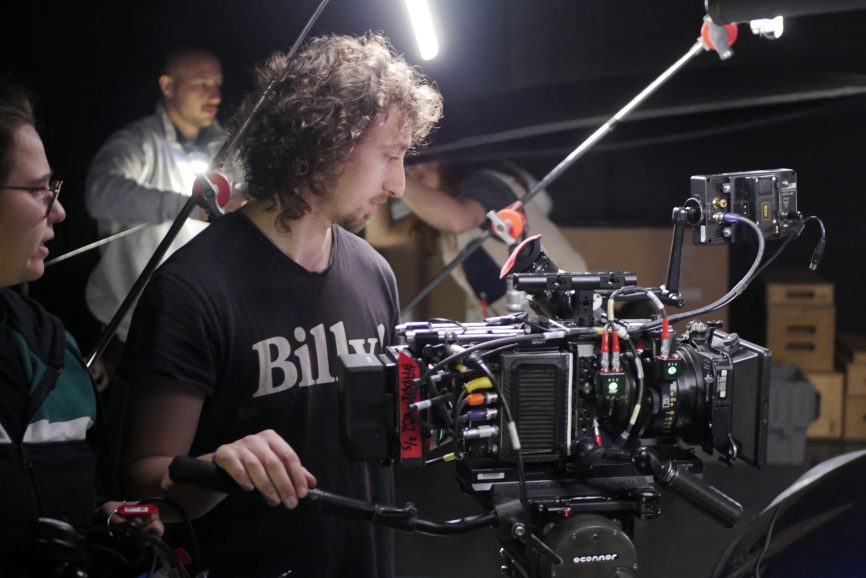
The Cooke S4s ended up being the perfect choice as wide open at T2 they hold contrast so well and have such a wonderful falloff. Close focus distances were also something that played on my mind as I knew we’d be shooting on longer lenses and up close and personal, so having the ability to get close without worrying about dioptres was lovely.
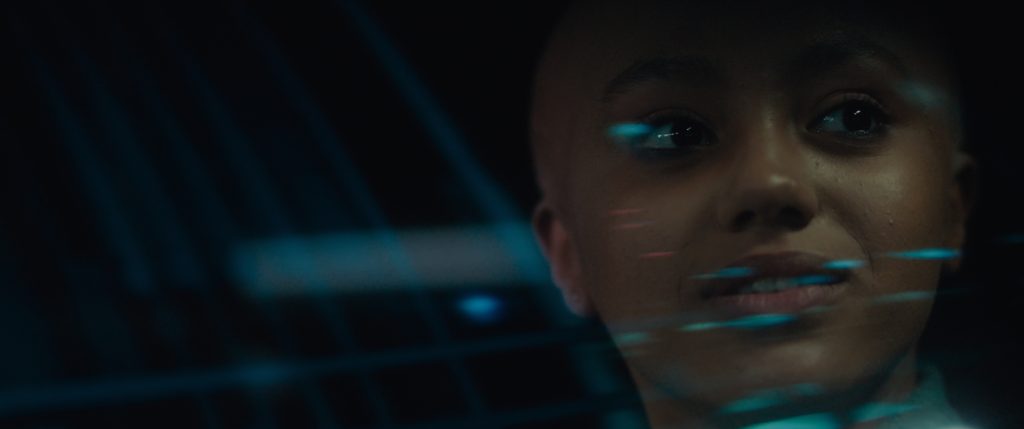
I added a 1/8th Black Promist which lived on camera to add some subtle halation and lower the contrast a tad, which worked better than expected as it was doing some wonderful stuff to the headlights on the TVs. In some of the exterior shots, we used a CPL filter to control the strength of the reflections in camera as the TVs could be a little strong and hinder viewing the performance.
Grade
The process of grading Sherbet took it to another level and unlocked some potential I didn’t realise was there. During prep we created a bible to work from, a shot list which also doubled up as a look book of visual references which really became invaluable when discussing the grade with Karol Cybulski. I can’t stress enough how powerful a tool Shotdeck is when it comes to storyboarding and developing a visual look for your projects. We took inspiration from Locke, Drive My Car, Moonlight, and Queen & Slim, which all spend a considerable amount of time in moving cars at night. They’re all very beautiful films and very high bar to aim for, especially on our budget.
In prep, we initially decided that we wanted to have quite realistic look with lots of green, yellow, and sodium lighting, as a subtle visual indication of Isa’s condition. This quickly changed after seeing Karol work her magic to bring Jay Simpson’s and India Brown’s skin tones to life. Relying on Becca Lymbourides’ makeup to convey Isa’s condition really freed us in the grade to be as creative as we’d like without any compromises.
Collaboration is key
Getting Sherbet across the line was a tough but rewarding challenge, and it certainly wouldn’t have been possible if we didn’t surround ourselves with the right team. People who, firstly, have the skillset to help you pull it off, but more importantly, who believe in what it is you are trying to achieve.
Whilst the way we shot Sherbet worked for the most part, it was a huge learning experience. I think Greig Fraser ASC ACS nailed it on the head in his article about using VP on The Batman: it’s an entirely new skill set and workflow that still needs to be developed and improved and I’m very glad I got to work with such talented people that think on their feet and are great problem-solvers. We had to think outside the box and jerry-rig QTAKE to work for us and I know if I get to shoot something like this again there is a lot I would change and develop to make life easier.
To be totally transparent, a video department would have cost a small fortune under normal circumstances, we were lucky that we knew James and he was kind enough to help us out. It also goes without saying that Panavision and Panalux also played a huge role in making this possible. They understand the plight of the independent filmmakers so if they aren’t busy supplying huge features that empty the warehouse of kit, then they are more than happy to help out where they can. Every independent film needs their small wins and this was one of ours.
Sherbet is not perfect by any means: the process had its obstacles and teething problems, and without a doubt shooting Sherbet on a VP stage would have been easier overall. But we do think there is a potential sweet spot for QTAKE and big TVs, especially on indie features and TV shows where you might not have the tens of thousands of pounds for a VP stage but do have enough budget to hire a video operator and their kit.
Watch the filmmakers’ fascinating behind-the-scenes video below…