Have you ever encountered this situation: a sky so bright you can’t get proper exposure on both sky and foreground at the same time? What to do? Well, it is very likely you know the answer to that one: use a graduated neutral density filter. Optical filters have long offered the option to treat one part of the image differently than another. What you might not be aware of is that close up lenses also allow this same opportunity. In that case, what you need is the split-field lens.

Here’s the typical split-field situation: you’ve got a background that contains details that must be in focus at the same time as there are foreground details that must also be sharp and clearly in focus, and, further, that the ability for depth-of-field to allow sharp focus on both is beyond what your primary lens can provide, even with the lens iris closed down. The reason the split-field lens shines here is that, like the graduated neutral density filter, it allows for different treatment of foreground and background simultaneously.
Let’s look at the example images to illustrate how this works. In Image 1, the unassisted primary lens can focus on the foreground, but not on the background at the same time. Image 2 shows what happens when focus is on the background-the foreground is soft and unfocused. Image 3 shows the power of the split-field to have both fields in focus simultaneously.
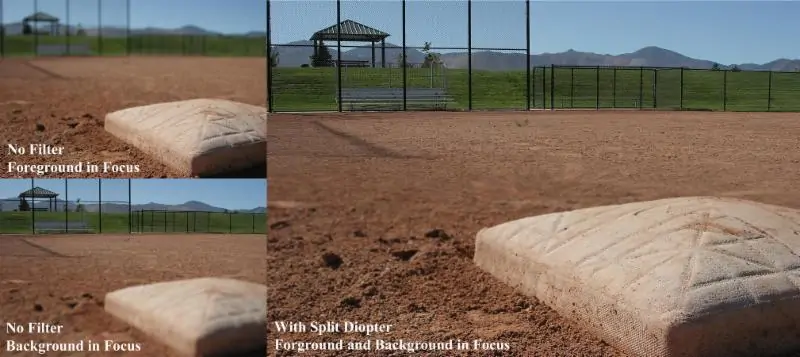
To produce a split-field lens is “simply” a matter of cutting a standard close up lens in half and mounting it in a ring that allows for rotation to fit the effect to the scene. The half without the lens, of course, functions just as it normally would; the half with the lens functions much as it would with a close-up lens. The key difference here is that there is a softly out-of-focus line along the cut edge of the split-field lens that separates the near half from the far. You do have the ability to determine how much softness there is at this edge; closing the lens iris will narrow the soft line, opening the iris will widen it.
It may not seem an easy task to fit the split-field into your work, but like anything else it helps to know how to do it. Here’s the basic 5-step procedure:
- Select a primary lens focal length that provides the desired framing;
- Select the diopter strength for the split-field that will focus on the foreground subject when the primary lens is in focus on the background;
- Mount the split-field in the chosen diopter strength and align the lens-half with the foreground subject;
- With the primary lens in focus on the background, frame the shot, and adjust camera position the small distance needed to focus on the foreground subject;
- Shoot!
There are a few things further to consider to get the best results from the split field lens. It will work best when you can place the out-of-focus line between the foreground and background in an area that has little detail and won’t draw attention, like in the dirt between the base and the backstop in the accompanying images. Also, don’t have anything travel between the two fields as it would dramatically (and startlingly) increase in size most unrealistically as it went, for example, from far to near field. And remember to set the T-stop to optimize the width of the out-of-focus line.
Learn more about Split Diopters here
Content provided by Schneider Kreuznach Optics.


