Please share an outline of the production?
Don’t Talk About the Monster on the Roof is a short student film that follows four buddies on a road trip who are confronted with a monstrous creature living on the roof of their car. This film was a final major project for the Screen Arts course at Curtin University in Perth, Western Australia.
Principal photography took place over a total of seven days in late 2023. We spent three of those days on location in rural WA and the rest at Limitless Studios in Perth. The location shoots were first up, and ironically, the main car used for filming broke down on day one, hundreds of kilometres away from our next location. All credit to the producer Darrel Suralin for quickly organising a solution in the form of a tow truck. The car itself was an older model and replacing the parts would have taken a significant amount of time, so our only real option was to tow it to each location.
It was lovely to travel together with the crew which helped build a bond — a long car ride is a great way to get to know someone, and on this shoot I spent more time in a car than ever before! There’s nothing like a confined space to really get to know somebody well. We were fortunate to work with excellent cast and my sympathies to them for all the time spent in the incredibly small car. They were quite happy for the scenes where I had to jump in the car with the camera and experience just how confined and sweaty it was. Nothing like solidarity through pain!
Why was it so important to tell this story? How different was the production from previous projects?
This project is unlike anything I had worked on previously. I’ve always been taught to pick projects that scare you a little in terms of its scope and this one terrified me. With a mixture of car work, stunts and VFX sequences — this was a massive undertaking particularly at a student level. Ultimately the director Christopher Paik-Swan and producer Darrel helped to convince me to come on board and I felt confident to come on board knowing how hard they both work.
The film itself is a bit of a homage to older work from Ozsploitation cinema and I think we felt it was important to tell this story as we wanted to prove what students can be capable of, even on a low budget.
How did the director articulate what they were looking for?
Chris discussed his vision for the project with me through a variety of lookbooks and film recommendations. We met regularly at university and talked at length about the tone he wanted to set as well as the various character dynamics throughout. Chris was also present during the various camera and lighting tests we did throughout pre-production and I was able to get quick feedback on what he preferred. It was a great collaborative process.
How did you decide upon the visual language?
Overall, we opted for more restrained camerawork. Chris and I discussed the tension gradually ratcheting up as the characters feel more and more trapped. I knew that I wanted to start out the film on wider lenses and gradually go tighter and tighter during the runtime. This was to compress the characters in the car and make them feel imprisoned within the car itself. We were also motivated by experimenting with the different angles within the car. Having characters in a set position for most of the short was a huge limitation but we knew we could find unique ways to display their varying emotional states through the different shot choices.
How did you go about devising the shot list?
Throughout pre-production Chris, Darrel and I would sit in our sound recordist/designer, Emmet Doudle’s car and discuss how we would shoot the different sequences. We were quite inspired by classic Ozploitation films like Wake in Fright and Razorback. By sitting in the car, we found it easier to discuss blocking and angles particularly for some of the sequences that required characters to be pulled out of the car by a giant tentacle. Some of the more complex sequences were storyboarded to see if they would cut together well.
What cameras and lenses did you use and why? Who supplied them?
Most of our budget went towards the studio rental and travelling cast and crew to and from our rural location shoots. As a result, the investment available to put into the camera and lens package was impacted. Curtin University allowed use of their Sony FS7 II, Samyang XEEN Prime Cinema Lenses along with a Sony FE PZ 28-135 zoom. which we spent a lot of time testing to see their quirks as well as how they interacted with the LED wall. I had tested the other lens set that was available from Curtin which I vaguely remember was a set of Sony primes but I found they flared quite aggressively blue. I felt that this didn’t accurately capture the extreme Aussie heat that we wanted to depict, which I always associate as being a burnt orange. The Samyang set fit more closely with this. For the location shots with the car driving we used a Sony a7S III with Sony G-Master lenses mounted to the car.
How did you go about devising the lighting schemes and what fixtures did you use and why?
Luckily I was able to do some lighting tests using the wall on a test shoot, which was massively helpful. I thought about where I wanted to motivate most of my light from, which was the sun. When creating the background plates I made sure to ask the VFX artist to have the sun always be behind the car. My lighting then revolved around the sun being a backlight to separate/edge the characters out from the car. Otherwise I just tried to shape the light as much as possible from outside the car. I was very lucky to work with a fantastic lighting team in James Dudfield and Tallulah Armenti, who leant their advice to scenes as well. We used a variety of LED fixtures as we needed smaller lights that we could easily move in the studio space.
For the outdoor location shoots it was predominantly based on scheduling for the sun position and then working with frames for bouncing.
Did you have to create any custom camera and lighting rigs?
We didn’t have to create any crazy custom camera and lighting rigs for this project. It was predominantly done using a mixture of tripod, dolly, car mount and jib arm shots.
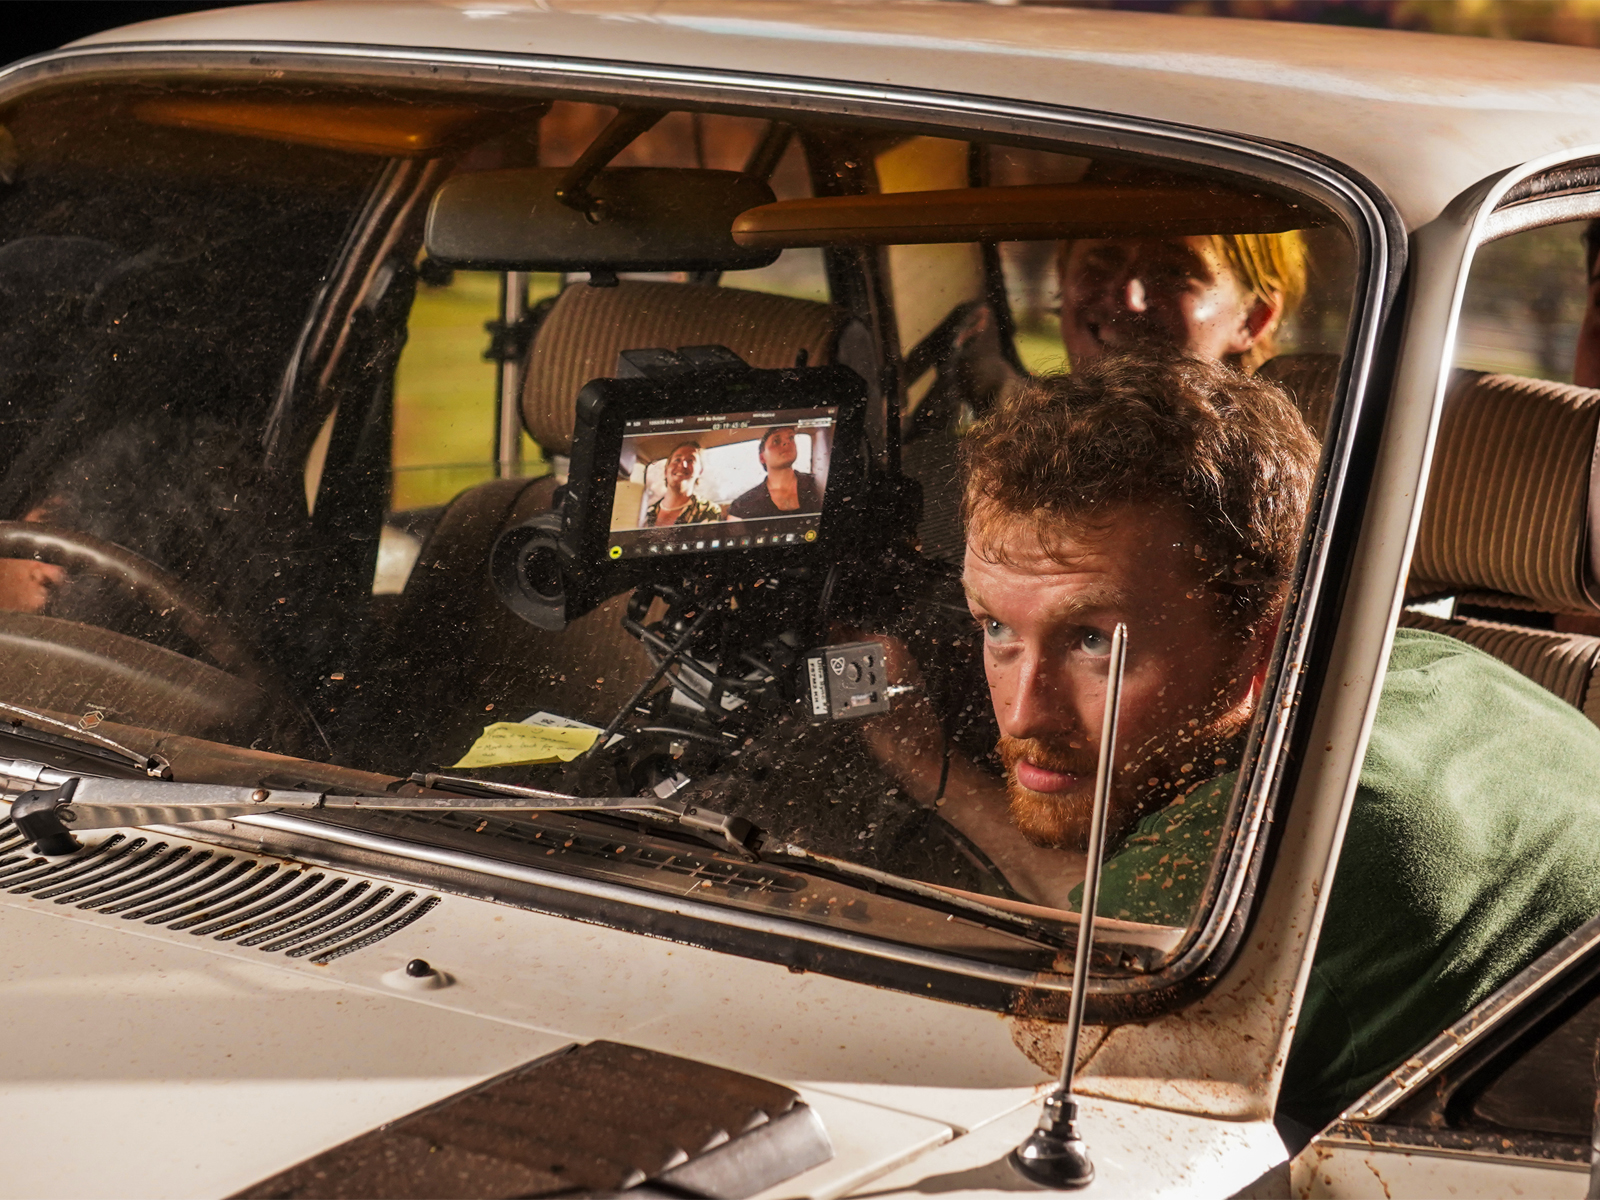
A lot of the action takes place in the car. What techniques and tools did you use to capture this?
We utilised Limitless Studios LED virtual production wall for our simulated driving sequences. Having the ability to quickly cycle through different backgrounds and adjust on the fly was a lifesaver. It was relatively quick to adjust the car with the vehicle positioning jacks as well. We unfortunately didn’t have access to a car mount whilst at the studio so I opted to place the camera on a cinesaddle on the hood to emulate those particular angles. The rest of the action was filmed on tripods close by to the car. In post I was then able to add some camera-shake to give the illusion the camera was attached to the car.
How did you capture the top down shots of the car?
The top-down shots of the car were captured using a DJI Mavic 3 drone. This was my 1st AC Aswin Oomman’s drone and he was able to pilot and match it to the car’s speed as it drove along the dirt road. Including that birds eye perspective added a rather ominous sense to the introduction, which Chris and I wanted to hint at.
How did you work with virtual production technology to achieve some shots?
We were very lucky to work on Limitless Studios virtual production technology. I had tested green screen and rear projection as methods for simulating driving. After testing the LED wall, I realised there were several ways to enhance the realism — including trying to shoot through as much real foreground elements as possible, only showing small parts of the wall on screen at once, and minimising camera movement where possible. My aim was to have the “sunlight” in the scene interact with the car in a way that helped to sell the illusion. This involved creating carboard tree branches to wave in front of the lights simulating the sun passing through trees. It was a wonderful experience embracing this new technology and learning how it can enhance scenes as well as some of the limitations of it.
The background plates were created in Unreal Engine with the help of writer/VFX artist Max Joyce. It was a great experience getting to choose where I could put the sun in the plate and then using that to dictate the lighting.
How did you create the creature effects?
The creature effects were created by writer/VFX artist Max Joyce who did a fantastic job. The actors were interacting with a puppet tentacle during the shoot and Max was then able to layer the effects on top of this tentacle. Max was also there on set letting me know exactly what he needed in terms of refrence and plate shots. He tested several different iterations of the creature and sent it through for feedback particularly on colour and texture. This was my first time working with a VFX element like this and it was a great experiencing collaborating with Max.
What challenges did you encounter when shooting the project and how did you overcome those?
As mentioned previously working with the wall was a massive challenge and adjustment. It was vital for it to pass as real and not distract from the boys in the car. Through extensive testing I was able to figure out the best settings I felt for the camera when working with the wall. Then it was about working with lighting in order to make it feel believable. I also always made a mental note to double check the horizon line on the wall to make it sure it matched up realistically with the camera positioning.
As the majority of the short took place within the car it limited my options in terms of angles and coverage. We also couldn’t take the headrests off in the car, which meant the backseat actors performances sometimes had to be in between the two seats if I was shooting from the front. Having this limitation was a good challenge though and it caused us to try and see what we could do differently in each scene and think outside of the box.
Most of our challenges were related to working with a minimal budget. We had to do our best to stretch our limited resources as much as possible and we planned a great deal of our shots with knowledge of these constraints. Being aware of the budget from the very beginning helped us to be realistic and not give unrealistic expectations of what we could do.
How did you decide upon the colour palette and LUTs?
The colour palette was decided based on some of the references Chris and I were looking at. Some of the Ozploitation movies we were looking at had this very distinct burnt orange/yellow look to them particularly in the highlights that really captured the sweltering heat and oppressive nature of the outback. We also decided to embrace a more vibrant look to give the film a retro feel. I was also inspired by the photography and colours of Richard Misrach particularly his landscapes.
Was there much in way of changes in the DI and which colorist were you working with?
As this was a student production I hopped on as the colorist after picture lock. We had one major change, which was the final scene where Chris decided he wanted the scene to be set at night rather than the late day. This meant I had to grade a day for night look even though I hadn’t necessarily shot for that. It was quite tricky particularly with how dark the overall image should be. I was always conscious of taking too much information away from the image. In the end I graded the night scene quite stylistically, bringing everything quite down and adding blue into the midtones and highlights. It was a great challenge and a good opportunity to further my knowledge of what is possible in post.
Is there particular shot or sequence you are most proud of?
One shot I’m proud of is a long zoom into the rearview mirror of the car as one of the characters is pulled out the window by the monster. Chris and I had been trying to figure out different ways of having the boys pulled out of the car. In horror and slasher films characters are often killed in unique ways, but with our script each of the characters were pulled out of the car in the same way so we needed to find a unique perspective of portraying that each time. An idea we came up with was to show the death through the rearview mirror. We thought it was a unique way to depict the scene and this meant we didn’t have to capture too much of the VFX element, meaning less work in post.
The shooting day became tricky as we needed to see through the front windshield of the car and rearview mirror obviously showed the background. Given the LED screens are only on one section of the wall we had to find a way to obscure the background in the rearview mirror. After attempting rear projection, it was clear it wouldn’t be bright enough and decided to overexpose the back window significantly, perfectly obscuring the background. In the end it looked like the harsh summer sun.
I was really happy with how the final shot came together particularly with the driver moving the rearview mirror right at the end to change the frame. Finding ways to adjust the frame mid shot and recontextualise scenes are always a great way to add more storytelling to my camerawork!
What do you think makes a successful horror film and which films/cinematographer’s work in this area do you admire?
I think something that makes a successful horror film is the fear of the unknown. What you don’t see on screen is far scarier than anything you can show. As soon as you reveal a killer or creature in full it loses a certain sense of power. When I think of horror my mind always wanders back to Alien and the masterful way the creature is obscured in the set as well as the lighting. You only catch small glimpses of it right until the very end and it leaves you terrified.
I also really admire Jarin Blaschke’s collaborations with Robert Eggers. His recent work on Nosferatu is fantastic and the way that Count Orlok is obscured through blocking and lighting when Thomas visits him in the castle masterfully builds the tension. All you witness is Thomas’ extreme reaction towards him, which makes him all the more frightening. On top of that the camera often moves away from Thomas as he explores, and you begin to wonder where it is going. It’s almost as if it is possessed. The film is a fantastic piece of work.
What lessons did this production teach you?
I think that this production taught me what is possible on a low budget with an amazing crew. This was my first project working as a cinematographer. I genuinely wasn’t sure I would be able to learn everything I would need in order to use the LED wall as well as learn the VFX workflow. Spending all that time in pre-production learning the tools and making many mistakes whilst testing ended up paying off. This project really reinforced the importance of prep. I’m very proud of the final result considering all of the circumstances that went into making it. I think maintaining a positive attitude on set and managing the crew around me was a vital part of making this film a success.
I also learnt about the importance of not getting too wrapped up in the technology that is available to you. I think at times I got a tad caught up in working with the wall and making that look as good at possible that I didn’t always focus on making my shots serve the story. Technology is a tool to create convincing images but if it doesn’t add to the story then it’s just a pretty picture. This is a way of thinking that I’d like to take into each of my future projects.
Do you have anything to add?
I just wanted to add that I wouldn’t have been able to pull this off without all of the fantastic crew working with me. They were incredible the whole way through and I just wanted to thank them for their amazing work!